How to Tunnel Traffic With WireGuard Forwarding
By Edward Wibowo
Imagine the following scenario: you want to host a service from a local server of yours to the internet.
Connecting to https://service.example.com from any device should access the service.
However, there is one slight problem: you don’t have the means to port forward from the local server’s network.
For example, this scenario may arise if you don’t have access to the local server’s router (e.g. in a hotel or dormitory).
This problem can be solved by establishing a tunnel between the local server and an external (public-facing) server. Through forwarding traffic with WireGuard, a tunnel can be established easily and securely.
Architecture
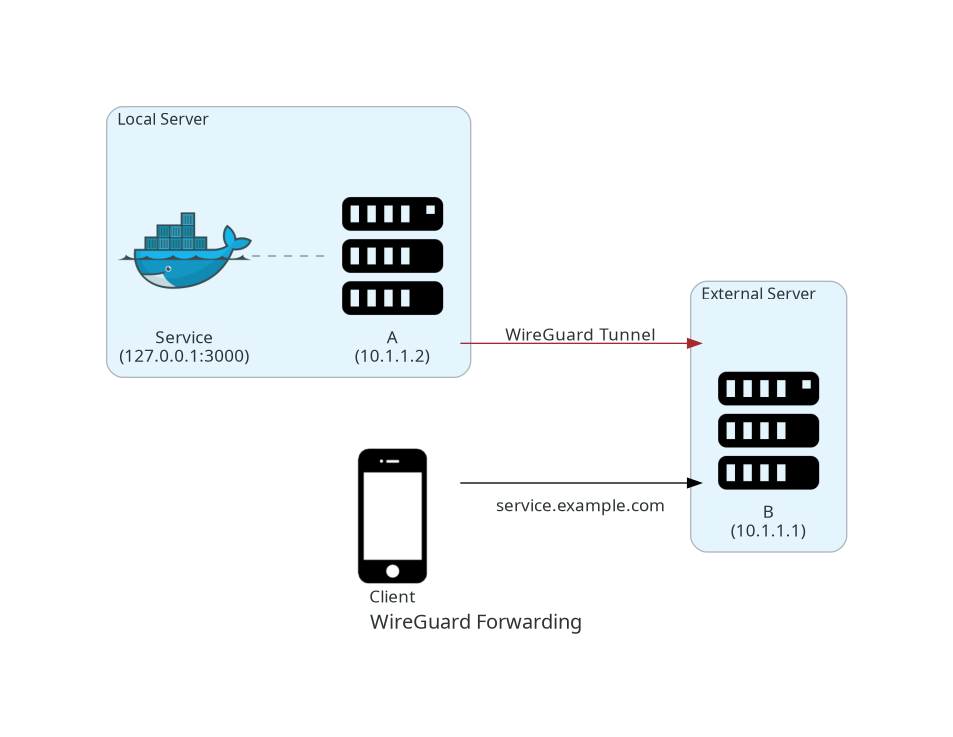
The diagram above illustrates a client accessing the service on the local server by interfacing with the external server. This way, the local service is accessible without exposing the local server’s network to the internet. The external server acts as a proxy sitting between the client and the local server.
Why WireGuard?
First and foremost, WireGuard is a communication protocol for VPNs. So why use WireGuard for tunneling traffic?
One benefit of using WireGuard is scalability. A single service can be tunneled to multiple servers as long as the server is a WireGuard peer. So, if one external server goes down, the service can still be accessible from other peer servers.
Furthermore, using WireGuard also brings about its traditional benefits: speed, security, and simplicity.
Requirements
The architecture requires access to an external server, which will serve as the proxy server. The server should have a public IP with port forwarding capabilities, so using a cheap VPS is a good option.
You will also need to have a working WireGuard tunnel connecting the two servers. Consider following the official WireGuard quick start instructions to learn how to do so.
Routing Traffic
The following instructions will assume a few properties of the WireGuard network. Feel free to modify the values to your liking (just ensure that you reflect these modifications in the configuration files):
| Property | Value |
|---|---|
| Domain pointing to external server public IP | example.com |
| WireGuard subnet | 10.1.1.0/24 |
| External server WireGuard IP | 10.1.1.1/32 |
| Local server WireGuard IP | 10.1.1.2/32 |
| Service IP and port | 127.0.0.1:3000 |
The goal is to get any traffic reaching service.example.com (pointing to the external server) to get forwarded to 127.0.0.1:3000 on the local server.
Local Server Peer Settings
Firstly, the local server’s peer settings should be adjusted:
# Local server's WireGuard configuration
[Peer]
PublicKey = {EXTERNAL_PUBLIC_KEY}
Endpoint = example.com:{EXTERNAL_WIREGUARD_PORT}
PersistentKeepalive = 25
AllowedIPs = 10.1.1.0/24PublicKey: External server’s public WireGuard key.Endpoint: Domain (or IP) of the external server.PersistentKeepalive: How often (in seconds) to send an authenticated empty packet to the external server.AllowedIPs: Make WireGuard facilitate traffic across the WireGuard subnet.
Without PersistentKeepalive, the WireGuard tunnel will only be active while the service is being accessed;
however, the tunnel should always be ready to accept any incoming (or outgoing) traffic.
Thus, there needs to be constant (and periodic) communication between the two servers.
Destination Network Address Translation
Next, a packet rule should be added to redirect incoming traffic from the WireGuard tunnel to the service.
This can be done using DNAT (Direct Network Address Translation) and the iptables command:
iptables -t nat \
    -A PREROUTING \
    -d 10.1.1.2 \
    -p tcp \
    --dport 3000 \
    -j DNAT \
    --to-destination 127.0.0.1:3000
-t nat: Specifynattable.-A PREROUTING: Append to thePREROUTINGchain.-d 10.1.1.2: Select all packets that are heading towards10.1.1.2(the local server’s WireGuard IP).-p tcp: Use TCP protocol.--dport 3000: Select packets that are headed towards port3000.-j DNAT: Specify that the selected packets should undergo DNAT.--to-destination 127.0.0.1:3000: Reroute all selected packets to127.0.0.1:3000(the local service).
To automatically append (and delete) the rules when the WireGuard interface is toggled, set PreUp and PreDown in the local server’s WireGuard configuration:
[Interface]
Address = 10.1.1.2/32
PrivateKey = {LOCAL_PRIVATE_KEY}
ListenPort = {EXTERNAL_WIREGUARD_PORT}
# ...

PreUp = iptables -t nat -A PREROUTING -d 10.1.1.2 -p tcp --dport 3000 -j DNAT --to-destination 127.0.0.1:3000

#                         👇 Remove rules with -D flag
PostDown = iptables -t nat -D PREROUTING -d 10.1.1.2 -p tcp --dport 3000 -j DNAT --to-destination 127.0.0.1:3000
With this, the rules will be added upon executing wg-quick up and removed upon executing wg-quick down.
Conclusion
If everything was set up correctly, the local service should be accessible from the external server through 10.1.1.2:3000.
To make this accessible to anyone on the internet, a reverse proxy can be used to point service.example.com to 10.1.1.2:3000.